You must know how to reconcile in QuickBooks Desktop to ensure the bank and credit card statements match. This is one of the crucial steps for balancing the books.
Reconciling is when you balance the checkbooks and evaluate if your bank and credit card statements align with your QuickBooks account. In the same way, QuickBooks Desktop needs reconciliation to ensure that transactions in the software match those shown in your banks and credit cards.
However, if you don’t know how to reconcile in QuickBooks Desktop, do not worry. This blog will guide you through the nuances of reconciling QuickBooks accounts.
Before we begin with that, though, let us see what opening balance is, as it is widely used in reconciliation in accounting software. Moreover, we will also explore the reasons that might lead to mismatching or incorrect ending balances.
 | For queries like how to reconcile in QuickBooks Desktop, on-call guidance, and issue resolution, contact our QB ProAdvisor at 1800.580.5375. These professionals are proficient in addressing QB issues quickly. |
Opening Balance and Ending Balance
Let’s say you created an account in QuickBooks and started tracking the transaction in your bank account. The bank balance at the moment when you started tracking the transactions is the opening balance.
The ending balance is the opposite of the opening balance. It is the amount that remains in your account at the end of the concerned financial period, which could be a week, a month, a quarter of the year, a year, and so on.
Both opening balance and ending balance can be positive, zero, or negative. Negative
Reasons for Issues in Ending Balances
Often, QuickBooks users witness that the ending balance on their QB account and bank or credit card statements don’t match. This means there is a mistake in entering or managing the QB journal entries and accounts.
Usually, the incorrect or mismatched ending balance results if:
- You entered an incorrect opening balance at the beginning of the financial period. In simple terms, you entered a value for the opening balance that didn’t match with the bank balance at the beginning of the financial period.
- There are issues with the transactions you entered into the QuickBooks. These transactions might either be incorrect or there are missing or duplicate transactions.
- You entered some transactions into QuickBooks that are yet to clear your bank.
How to Reconcile in QuickBooks Desktop
Follow the steps listed below which will guide you on how to reconcile in QuickBooks Desktop effortlessly.
Step 1 – Before You Start Reconciling
Before you begin reconciling, there are three things that you need to ensure.
- First, you must make a backup of the company file.
- Secondly, you should review the opening balance, especially if you are reconciling for the first time.
You can manually enter the opening balance as well although QuickBooks automatically enters the opening balance if you connect it with your bank account or credit card account. However, if you don’t wish to connect online banking with QuickBooks, you’ll need to enter the opening balance manually. This is done when you create an account.
Moreover, you can also edit the opening balance and starting date.
- Lastly, before you go ahead with reconciliation, you need to ensure that your journal is up-to-date and you have entered all the transactions for the financial year.
Step 2 – Begin Reconciling
To reconcile, you’ll need your bank statement. Moreover, figure out if you wish to reconcile for the current month, many months, or the whole year. In case you wish to reconcile for multiple months, you should start with the oldest month. Reconcile each month individually, moving from older to newer.
You might need to sign in if you are using a Merchant or Payments account.
- Open QuickBooks. Click on the Banking menu.
- Click on Reconcile. You will see many accounts.
- Choose the account you wish to reconcile.
- QuickBooks automatically enters the statement date. You can change it if it doesn’t align with your bank statement.
- QuickBooks uses the ending balance of the last reconciliation to get a beginning balance automatically.
- Enter the ending balance that is on your bank statement.
- Excluding the charges that you have already entered in QuickBooks, enter the service charge and what you earned on interest for your bank account.
Step 3 – If Your Beginning Balance Doesn’t Match
If your opening balance matches, you can skip to the next step.
If you find that your beginning balance doesn’t match the bank statement, there are some tools in QuickBooks that come in handy.
- If the values are different, click on the Locate Discrepancies option. This report helps you to spot the discrepancies and figure out what is causing the issue.
- If your opening balance doesn’t match, you’ll need to review your opening balance over the last few months.
- Also, check the beginning balance at different financial periods you previously carried reconciliation on. Moreover, check the original opening balance when you made the account and ensure that it is correct.
- If you find that you need to start from scratch or undo a reconciliation, all the reconciliations for the financial period after that time will be cleared. The ending balance at the last reconciliation becomes your beginning balance for the financial period that follows it.
Step 4 – Tally QuickBooks with Bank Statement
If the opening balance for the period you wish to reconcile is correct, then previous years’ transactions won’t have impacts on the balancing for this financial period.
- Compare your bank statement and transactions that are entered in your QuickBooks account.
- In this way, you’ll be able to spot duplicate, missing, or incorrect entries.
- To help focus on the transactions for the concerned financial period, you can opt to hide the transactions after the statement’s end date.
- You can also reconcile a credit card account in this manner. For credit cards, there will be sections named Credits, Payments, Cash advances, and Charges. Take care of one section at a time.
- In case you are reconciling the account that is for online banking, click on matched and enter the end date of the statement. QuickBooks will select the transactions it downloaded and matched.
- A matched transaction will be distinguished by a lightning bolt beside it. Once you reconcile it, the bolt will become a checkmark.
- Moreover, you can also sort the list by selecting the headers or titles of columns.
Step 5 – Match Transactions
Now, we will match each transaction one by one.
- Open your bank statement. Check the first transaction.
- Find the same transaction in QuickBooks in the reconciliation window and tick the checkbox for it.
- Do this for other transactions.
- When you clear or add transactions to the reconciliation, you will see that the Cleared Amount will decrease.
- However, when cleared or added deposits or other credit amounts, the amount will increase.
- When you find a transaction that doesn’t show in the bank statement, don’t checkmark it.
- Get info about the transaction by double-clicking it or selecting it and clicking on Go To.
- If you wish to check the information that you have entered in the last step, you can do so by selecting Modify.
In the end, when the reconciliation is done, the QuickBooks and bank account will have exactly the same value.
Important Guide: QuickBooks Bank Reconciliation Problems – 6 Must Try Solutions
Step 6 – If Transactions Didn’t Match
If your transaction matched and you were able to get a zero difference between the bank statement and QuickBooks, you can skip to the next step.
- Open the reconcile adjustment window in QuickBooks if your issue is about a bank account.
- This will allow you to
- Return to reconciliation and review things again.
- Save and leave the reconciliation to review and edit later
- You also have the option to make the adjustments to reconcile. However, only do this when you are sure that the data you entered on QuickBooks is accurate.
- This entry goes into an account especially made for expenses named as reconciliation discrepancies.
Recommended To Read: QuickBooks Reconciliation Discrepancy – Causes and Cure
Step 7- Review Reconciliation Adjustments
You can check the previous reconciliation report, which will show all the adjustments on the list. It also shows the cleared transactions and changes that are made after the transactions that do not show discrepancies.
- For that, navigate to the Edit menu and select Find.
- Go to the Find Window.
- Now, choose the Advanced tab.
- Click Memo, and in that field, choose Balance Adjustment.
- Now, click on Find.
Step 8- Review Cleared Transactions
Follow these steps to review all of the cleared transactions.
- Navigate to the Reports menu.
- Click on Reports Center.
- Now, search for the previous reconciliation report and open it.
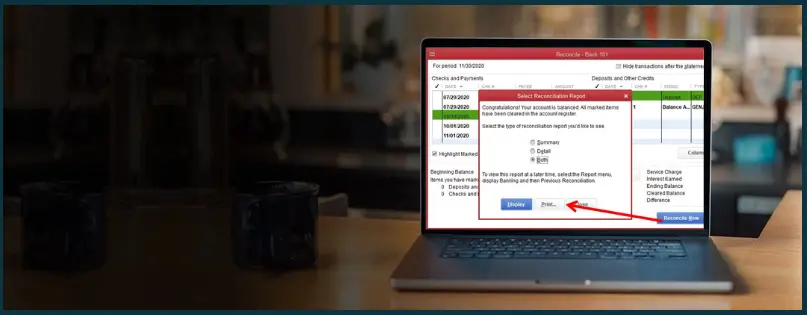
- In that, choose the account you reconciled and choose from detail, summary, or both.
- Now, choose the transactions that cleared any changes that were made to these transactions.
- Lastly, click on Display.
Note: For other kinds of accounts, QuickBooks allows you to make payments through bills or checks through the payment window. This covers the outstanding balance. You can click cancel when this window pops up if you don’t want to make a payment.
Step 9 – Review Reconciliations
Once you are done with reconciling, choose display to get the reconciliation report. Click on print to print the report.
You can alternatively review the reconciliation report in this way.
- Click on the Reports menu.
- Now, click on Reports Center.
- Open a previous reconciliation report.
- Choose the account you reconciled and choose from detail, summary, or both.
How Do I Edit Previous Reconciliations in QuickBooks Desktop?
Now, first, you need to understand that editing reconciled transactions can cause discrepancies and require you to redo the reconciliation for the accounting period after the transaction you edit.
Therefore, talk to your accountant before you follow these steps to edit the transactions in a previously reconciled period
- Now, click on Accounting.
- Tap on the Chart of Accounts tab.
- Choose the right bank account. Now tap on View register.
- Find the transactions you want to edit and look for R in the column.
- Click on the transaction.
- Now, click the R status many times until it’s blank or unreconciled.
- Tap on Edit.
- Make the required changes and save them.
Now, you can go back to the register and manually reconcile. Cross-check the reconciliation to look for any discrepancies.
How to Get Reconciliation Reports in QuickBooks Desktop
It is very easy to view the reconciliation report in QuickBooks Desktop.
- Open QuickBooks Desktop and tap on Reports.
- Enter Reconciliation Report in the Find report by name search bar.
- Tap on Reconciliation Reports.
- Click on the Account for the reconciliation report you wish to view.
- Choose the reconcile period from the Report period drop-down arrow.
- Tap on View Report.
Now, tap on the Print icon on the upper right side of the report.
How Often Should You Reconcile?
You should reconcile bank checks, savings accounts, and credit cards every month. Get your bank statement and match the transactions with that on QuickBooks. Do the same for credit cards or similar accounts. This helps in keeping the books balanced and accurate.
How Often Should You Reconcile?
You should reconcile bank checks, savings accounts, and credit cards every month. Get your bank statement and match the transactions with that on QuickBooks. Do the same for credit cards or similar accounts. This helps in keeping the books balanced and accurate.
Final Words
So, this was all about how to reconcile in QuickBooks Desktop. If you face an issue or have a query, feel free to get in touch with us. Alternatively, you can delegate the task to our ProAdvisor for a fast resolution. Dial 1800.580.5375 now!
You can follow the steps listed in the guide above to view the reconciliation report. Now, tap on the Print icon on the upper right side of the report.