QuickBooks programs might not be able to run or be active in the background if Windows Firewall or other security features block them. Therefore, if you face issues using QuickBooks in single-user mode or working on the company file in QuickBooks multi-user mode, you should check and ensure that the Windows Firewall and security settings are set right. Moreover, you need to check for antivirus blocking as well.
This is also valid for Mac users who either have QuickBooks workstations installed on their Mac computer, use a Mac computer to host the company file or both. In this blog, we will learn how to configure firewalls and security settings for Windows and Mac. If you use QuickBooks in multi-user mode, make sure to follow these steps on the host computer and workstations where you face the issue.
 | Setting up the firewall yourself, creating port exceptions, and checking all the security settings can be time-consuming and difficult. We recommend you don’t take a risk and connect to a QB ProAdvisor right away. |
Important: Before You Tweak Firewall and Security Settings
Before you tweak Firewall settings and create port exceptions, you must keep a few things in mind.
a. Start with the Server Computer and Continue to Workstations
If you use QuickBooks in multi-user mode, you need to configure firewall and security settings on both the host computer and workstations.
Follow the steps listed below, one by one, first on the computer that hosts the company file, i.e., the server computer, and then on the workstations where you face the issue.
b. Do You Use QuickBooks on Windows or MacOS?
Is your host computer or workstation running on Windows or MacOS? We have created two different sections for both Windows and Mac. Therefore, navigate to whichever operating system your computer runs on, i.e, Windows or Mac, and carry out the solutions listed in that section.
Section 1: QuickBooks Desktop for Windows
Let’s go about configuring Windows Firewall settings for your computer. First, let’s run QuickBooks File Doctor.
Step 1: Run QuickBooks File Doctor
QuickBooks File Doctor is an expert in fixing the common company file and network errors you might face. Therefore, your first attempt at fixing the Windows firewall issues must be running the QB File Doctor.
Follow these steps to run QuickBooks File Doctor:
- Close QuickBooks Desktop
- You need QuickBooks Tool Hub to run QB File Doctor. Therefore, if you don’t have the latest version of QuickBooks Tool Hub installed on your system, install it.
- Once you are done, open QuickBooks Tool Hub by either double-clicking the QB Tool Hub icon or searching for QuickBooks Tool Hub in the start menu.
- Tap on the Company File Issues tab in QuickBooks Tool Hub.
- Click on Run QuickBooks File Doctor. The File Doctor may take a minute or two to open. If the File Doctor doesn’t open, search for QuickBooks File Doctor in the start menu and open it from there.
- In the QB File Doctor window, select your company file. Tap on Browse and search if you can’t see your company file. Choose your company file in the window that appears.
- Now, choose Check your file and network (first option) and then tap on Continue.
- Provide the QB admin password and tap on Next.
The file doctor might take a while to finish, depending on the file size. Once done, it might even show a message that the scan was unsuccessful even if the File Doctor fixed the issue.
Therefore, open your QuickBooks Desktop and check if the issue you faced is resolved. If the problem persists, continue to the next step.
Step 2: Create a Firewall Port Exception for QuickBooks Desktop
If QuickBooks File Doctor isn’t able to fix the firewall issues, you will need to do it manually.
Note: Each QuickBooks Desktop version uses different ports. Therefore, if you use more than one version(years) of QuickBooks Desktop on the same computer, you will need to repeat these steps for each version separately.
- To start with, tap on the Windows Start button to open the Start menu.
- Type in “Windows Firewall” in the search box and select Windows Firewall.
- When Windows Firewall opens, tap on Advanced Settings.
- Right-click on Inbound Rules (Once we are done with Inbound rules, we will create Outbound Rules).
- Tap on New Rule.
- Choose Port followed by Next.

- Check and ensure TCP is marked.
- Tap on the Specific local ports field, and type in the specific ports needed for the QuickBooks year version you use:
- QuickBooks Desktop 2020 and later: 8019, XXXXX.
- QuickBooks Desktop 2019: 8019, XXXXX.
- QuickBooks Desktop 2018: 8019, 56728, 55378-55382.
- QuickBooks Desktop 2017: 8019, 56727, 55373-55377.
| For QuickBooks Desktop Versions 2019, 2020, and after Important Note: QuickBooks Desktop versions starting from 2019, 2020, and all the versions after that use dynamic ports. Dynamic ports are specific firewall ports and not a range, assigned during installation which gives QuickBooks Desktop exclusive access to certain ports. Here is how to get the dynamic port number for QuickBooks Desktop version 2019, 2020, and after ● Tap on the Windows button to open the Start menu. ● Type in “QuickBooks Database Server Manager” into the search field. ● Select QuickBooks Database Server Manager. ● Tap on the Port Monitor tab. ● Note the port number for the QuickBooks version you use. Now, tap on the Specific local ports field, and type in the specific ports needed for your QuickBooks year version. |
- Once you have entered the port number, tap on Next.
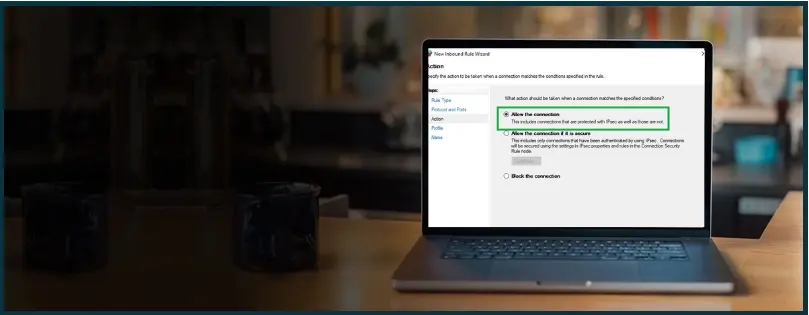
- Choose Allow the Connection, followed by Next.
- When prompted, ensure to mark all the profiles.
- Tap on Next.
- Now, create a rule and give it a name. For instance, you can name it QBPorts(YEAR).
- Finally, tap on Finish.
You have successfully created the Inbound Rules. Now, follow the same steps to create Outbound Rules for each QuickBooks Desktop version you use. In the step where you select Inbound Rules, select Outbound Rules.
Carry this out for all the QuickBooks Desktop versions (years) you use on this computer. Now, proceed to the next step.
Step 3: Create a Firewall Exception for the QuickBooks Programs
QuickBooks uses program files (.exe) that perform different tasks. If the Windows firewall blocks these programs from running, you will face different issues when carrying out QuickBooks operations.
Take a look at these QuickBooks executable files.
| QuickBooks Executable files | File Path |
| FileManagement.exe | C:\Program Files\Intuit\QuickBooks YEAR |
| DBManagerExe.exe | C:\Program Files\Intuit\QuickBooks YEAR |
| AutoBackupExe.exe | C:\Program Files\Intuit\QuickBooks YEAR |
| QuickBooksMessaging.exe | C:\Program Files\Intuit\QuickBooks YEAR |
| Dbmlsync.exe | C:\Program Files\Intuit\QuickBooks YEAR |
| QBCFMonitorService.exe | C:\Program Files\Common Files\Intuit\QuickBooks |
| QBDBMgrN.exe | C:\Program Files\Intuit\QuickBooks YEAR |
| FileMovementExe.exe | C:\Program Files\Intuit\QuickBooks YEAR |
| QBUpdate.exe | C:\Program Files\Common Files\Intuit\QuickBooks\QBUpdate |
| QBServerUtilityMgr.exe | C:\Program Files\Common Files\Intuit\QuickBooks |
| QBW32.exe | C:\Program Files\Intuit\QuickBooks YEAR |
| OnlineBackup.exe | C:\Program Files\QuickBooks Online Backup |
| QBLaunch.exe | C:\Program Files\Common Files\Intuit\QuickBooks |
| IntuitSyncManager.exe | C:\Program Files\Common Files\Intuit\Sync |
Therefore, let us create exceptions for each QuickBooks program listed above. Follow the steps below for each QuickBooks executable file one by one.
- Click the Start button and open the Windows Start menu.
- Type in “Windows Firewall” in the search bar.
- Double-click Windows Firewall.
- Choose Advanced Settings.
- Right-click Inbound Rules (and create Outbound Rules when you are done with Inbound Rules). Tap on New Rule.
- Choose Program followed by Next.
- Click on This Program Path and select Browse.
- Now, follow the path for the first executable file in the table above. Tap on b.
- Choose Allow the Connection, followed by Next.
- When prompted, ensure all profiles are selected. Tap on Next.
- Now, create a rule. You can name it QBFirewallException(NAME.exe), where NAME stands for the name of the QuickBooks executable program for which you made the exception.
Now, create the Outbound Rules for the same QuickBooks program. Follow the same steps for all the QuickBooks executable files.
| For Multi-User Mode: Carry Out Steps 1, 2, and 3 on Workstations If you use QuickBooks Desktop in multi-user mode, you need to carry out the above steps on workstations as well. Once you have followed Steps 1, 2, and 3 on the host computer, carry these out on the workstations where you face this issue. Once you are done, restart all the computers and run QuickBooks Desktop. If you use QuickBooks in multi-user mode, open it both on server computers and workstations. Check if the issue you faced earlier persists. If it does, continue to Step 4. |
Open QuickBooks Desktop and check if you continue to face the problem that forced you to create Windows firewall exceptions.
Step 4: Check Antivirus Settings and Create Exceptions
Let’s say you created the required Windows firewall exceptions. However, you still face issues when using QuickBooks.
Your computer will probably have Windows Defender and an antivirus installed. Therefore, you need to create antivirus exclusions for QuickBooks.
Step 5: Restart the Computer
Once you have followed the above steps, restart your computer. The issue you faced while using QB Desktop will be resolved.
Section 2: QuickBooks Desktop for MacOS
Do you use QuickBooks on a Mac computer? Here is how to configure MacOS firewall settings to allow QuickBooks to run. Follow these steps in order, and if you face an issue, don’t hesitate to reach us.
a. Check if the MacOS Firewall is On
Let’s check if your Mac Firewall is on. If the MacOS firewall is NOT turned on, there is no need to follow the steps b and c.
- Tap on the Apple menu and choose System Settings.
- Tap on the Security & Privacy icon and choose Firewall.
Now, check if the firewall is turned on.
- If the firewall is turned on, continue to the next step.
- If the firewall is NOT turned on, there is no need to configure firewall settings for QuickBooks since the firewall is not blocking QuickBooks.
b. Configure Firewall Settings
Let’s allow QuickBooks access through the MacOS Firewall.
- Tap on the Apple menu and choose System Settings.
- Tap on the Security & Privacy icon, and choose Firewall.
- Choose Firewall Options.
- In case the button is grayed out, tap on the lock icon to unlock it.
- Ensure the QuickBooks Desktop app is configured to Allow Incoming Connections
If you use QuickBooks Desktop in multi-user mode and host the company file on a Mac computer, you will need to set the QuickBooks Server app to allow incoming connections.
- Ensure the QuickBooks Server app is configured to Allow Incoming Connections.
c. Open Specific Ports in MacOS
If your MacOS firewall is on, you might need to unblock specific ports that QuickBooks uses. MacOS Firewall can block QuickBooks port and allow its access to the internet.
Follow the steps listed below to open the specific ports that QuickBooks uses. If you have more than one version of QuickBooks installed on the same computer, you will need to follow these steps for all the QuickBooks versions you use one by one.
QuickBooks uses these ports in Mac: 56565 TCP, 5297 TCP, 5298 TCP/UDP, and 5353 UDP.
Follow these steps below one by one to open all the above ports in a Mac computer:
- Open Terminal.
- In the Terminal, type in the following to stop the pf (packet filter) firewall if it’s active: sudo pfctl -d
- Next, use the nano text editor to open the configuration file for pf: sudo nano /etc/pf.conf
- The editor will show the default configuration, which contains some important stuff. You can add your custom rule, but make sure you do so below any existing configurations.
Now, to open any specific port, for example, port 12044, type in the following code at the bottom of the file: pass in inet proto tcp from any to any port 12044 no state

- Press Cmnd + X keys to exit nano. Now press Y and Enter. This will save the file with the same name.
- Enter this command to re-load the firewall’s configuration from the file you recently edited: sudo pfctl -f /etc/pf.conf
- Lastly, enter this command in Terminal to restart the firewall: sudo pfctl -E
Repeat these steps for all the QuickBooks ports listed above.
Now, restart your computer, launch QuickBooks Desktop, and check if the issue you faced earlier is resolved.
If You Use QuickBooks in Muti-User Mode: Carry out the firewall configurations on both the host computer and workstations. Once done, restart the computer, launch QuickBooks, and check if you face an issue.
a. Check for antivirus blockage
If you are still facing an issue using QuickBooks on your computer, it might be that an antivirus program is blocking QuickBooks. Learn how to create QuickBooks exclusion for your antivirus.
Final Words
So this was all on how to configure firewall and security settings for QuickBooks Desktop on both Windows and Mac computers. However, if you face an issue or continue to have a problem using QuickBooks, reach out to a QB ProAdvisor.
A QB ProAdvisor has the technical expertise and know-how it needs to resolve QuickBooks issues. Dial 800-580-5375!
Top Queries
You can run a command on the Terminal to know which port a program is using. Open the Terminal app, and enter this command: sudo lsof -nP -iTCP:5000 | grep LISTEN
Alternatively, you can also open System Activity Monitor and go to the Network tab. Tap on the Ports column and see what TCPIP number a specific process is using.
If QuickBooks’ access to Windows or MacOS Firewall is blocked, you will need to create firewall exceptions for QuickBooks. Scroll up to learn how you can create QuickBooks exceptions for Windows Firewall, MacOS Firewall, and antivirus firewalls.
Here is how you can block QuickBooks from connecting to the internet.
● Open QuickBooks Desktop and log in as a user with sufficient rights to change system preferences and settings.
● Tap on Help, and click on Internet connection set-up.
● Choose I do not have an Internet connection followed by OK.
Open the Norton product main window and tap on Settings. Now, choose Firewall and select Program Control. Now, choose the application that you want to allow access to the internet. Tap on the Access drop-down menu for the program entry, and tap on Allow.