Is your QuickBooks not seeing mapped drives? We map shared drives to host the company file and open it from other computers in QuickBooks. However, sometimes, you might not be able to see the mapped drives in QuickBooks.
What might confuse you is that you might be able to see the shared drive in your file explorer. However, when you open QuickBooks and try to access the company file, you can’t see the shared drive anymore. In this blog, we will explore how to fix the issue when QuickBooks can’t see the mapped drive.
 | This detailed guide will walk you through the steps to take if your QuickBooks is not able to see the mapped drive. However, an expert can help you resolve the issue immediately. Dial 1(800) 580-5375 now and get your QB working perfectly right away |
Can’t See Mapped Drive in QuickBooks
Let’s say you use multi-user mode to host the company file on a computer and work on it on various workstations. Now, you may face the following issues:
- You can’t see the shared drive on all the computers.
- You can see the shared drive on all the computers except one.
- Several users work on the company file in multi-user mode, but a particular user can’t see the mapped drive.
- A user can see the mapped drive in the file explorer but can’t browse the mapped drive in QuickBooks.
These are some common issues you might face while accessing the company file in multi-user mode.
Why Is Your QuickBooks Not Seeing Mapped Drive?
Let us get to know the possible reasons why you might not be able to see the mapped drives in QuickBooks.
- The folder and Windows access permissions might not be set correctly.
- The particular user might not have access to the company file.
- The Windows user profile might be corrupted due to factors like
- Problems in hardware like bad memory or hard drive failure.
- Antivirus software scans the computer while trying to log on.
- Malware infection.
- A force shutdown.
- System files were damaged by disk write errors, power outages, or virus attacks.
- Failed Windows Update or Automatic Updates.
- The drive might not have been mapped correctly or needs a remapping.
Carry Out These Solutions If Your QuickBooks Can’t See Mapped Drives
Let us now proceed to fix it if your QuickBooks does not see the mapped drives problem. We will explore different scenarios and walk you through the troubleshooting methods that fit those. Carry out the solutions that fit the issue you face.
1. But First, Update QuickBooks and Windows
The multi-user mode involves network communication between several computers and the QuickBooks Desktop application. Therefore, we want to make sure that your Windows and QuickBooks Desktop have the latest components.
This is why you must:
a. Update QuickBooks Desktop
Follow these steps to update your QuickBooks Desktop to the latest release, depending on the QB version and operating system you use.
b. Run Windows Update
Is your Windows missing the latest updates? Follow the steps listed below to run the Windows update on the computer on which you face the issue. We recommend you run the Windows update both on the host computer and the workstations.
- Click on the Start
- Type in Windows Update in the search bar.
- Now, tap on Windows Update or Windows Update Settings.
- The settings window will open.
- Do you see a button for Check for Updates? Click on that.
- The Windows will download and install the available updates.
- Once all the updates available are downloaded, restart your computer.
Once you carry out the above steps, reopen QuickBooks Desktop and browse for the mapped drive again. If the issue persists, move on to the next section.
2. When Other Users Can See Mapped Drives But a Particular User Can’t
Suppose several users access company files hosted on the server. Other users can see the mapped drive, but a specific user can’t see the mapped drive in QuickBooks.
Now, as the other users can see the mapped drive, QuickBooks does have the required access to the company file. Moreover, it also tells us that there are no issues in the mapping or the common network connection at the hosting end.
In this scenario, the issue lies at the end of the user, who can’t see the mapped drive. The problem might be hidden in the user profile, the QuickBooks Desktop application installed on the user’s computer, or the network connection. To fix it, you can try the following things:
- Ensure that your Windows and QuickBooks Desktop have the latest update.
- The user profile you use to log in to the windows has the administrator rights
- Finally, try creating a new user profile on Windows and use QuickBooks on that.
If nothing works, you can try creating a new user profile on QuickBooks to fix this. Here is how you can create a new user profile on QuickBooks:
- Open QuickBooks Desktop and tap on the menu.
- Select Company.
- Tap on Set Up Users and Password and choose Set Up Users.
- Click on Add User…
- Provide the required details, such as Password and username. Once done, tap on Next.
- You will see the access for the username window. Choose the areas of the QuickBooks the user will have access to. Moreover, check the user’s access to different areas of the company file and choose among No Access, Full Access, or Selective Access.
- Finally, tap on Finish.
3. When QuickBooks Can’t See the Mapped Drives at any Workstation
Is your QuickBooks not seeing mapped drives regardless of the workstation you use QBD on? The problem might lie on the hosting end. Therefore, let us check the windows and folder permissions.
a. Ensure Good Network Connectivity
The mapped drive requires a network connection, such as a local area network to connect. Therefore, check and ensure that your network connection is stable.
b. Ensure Windows Access Permissions to Share Company Files
QuickBooks needs access to the folder storing the company file. Therefore, let us check the Windows access permissions that allow QuickBooks to share the company file.
If you use Windows 10 or 11
- Click on the Start button to launch the Start
- Type in File Explorer. Open File Explorer.
- Now, navigate to the folder that contains the company file. Right-click on the folder.
- Tap on Properties followed by Sharing. Select Share Add.
- Choose the QBDataServiceUserXX that fits your QuickBooks Desktop version’s year.
- Make sure the permission level of all users is set to Full Control.
- Finally, tap on Share.
If you use Windows Server 2012
Before you perform the steps listed below, you need to make sure that File and Storage Services are installed on your Windows server.
- Click on the Start button to launch the start menu.
- Type in Run in the search bar. Tap on the Run icon to open the command window.
- In the command window, write Server Manager and hit OK.
- Choose File and Storage Services.
- Click on Shares.
- Click on the Task drop-down menu and choose New Share. You will see different File Share Profiles. To learn more about a profile, click on it and read the description.
- To select the default profile, tap on SMB Share – Quick.
- In the Share location field, choose Type a custom path.
- Now, browse and find the folder that you need to share.
- Choose the right folder and click on Select a Folder.
- Tap on Next.
- The Configure Share settings will have default share settings. You can continue and click on Next to use the default settings.
c. Check the Folder Permissions
Now, let us check the folder permissions and ensure they are set correctly.
- Click on the Start button to open the Start
- Search for File Explorer. Right-click on the icon for File Explorer.
- Tap on Properties.
- In the Security field, choose Advanced.
- Tap on QBDataServiceUserXX, where the XX is for your QuickBooks Desktop version year.
- Choose Edit.
- Go to the settings listed below and set each of them to Allowed.
- Traverse Folder/Execute File
- List Folder/Read Data
- Read Attributes
- Read Extended Attributes
- Create Files/Write Data
- Create Folders/Append Data
- Write Attributes
- Write Extended Attributes
- Read Permissions
In case your permissions aren’t set correctly, here is how you can address that:
- In File Explorer, right-click on the folder that has your company file.
- Tap on Security. Choose Edit.
- Select QBDataServiceUserXX and choose Full Control.
- Select Allow.
- Finally, tap on Apply, followed by OK.
Now, restart your computers and open QuickBooks Desktop. Check if you can find the mapped drive in QuickBooks.
d. Remap the Network Drive
It is possible that the issue might stem from incorrectly mapping the network drive, or for some reason, you might need to map the network drive again. If none of the users can see the network drive, we recommend you remap it.
- Click on the Start button or simply press the Windows button on the keyboard to open the Start menu.
- Search for File Explorer and open it.
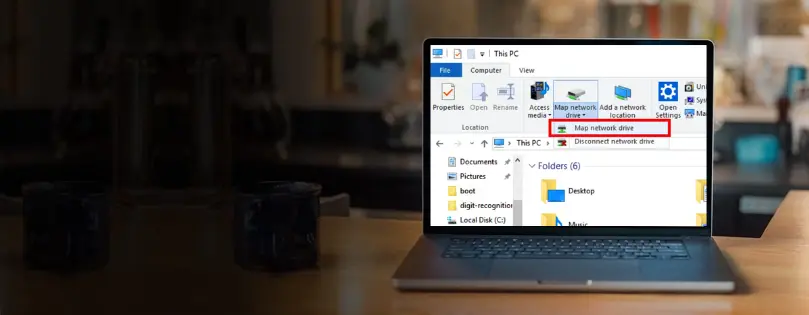
- Now, right-click on This PC icon in the left pane.
- Choose Map a network drive option from the list menu.
- Now, choose a specific drive letter for the mapped drive that you haven’t used for your other drives. For example, you can choose the letter S or Z.
- Click on Browse and navigate to the location where you store your company file. Alternatively, you can also enter the full path of the company file folder
- Make sure to choose the option for Reconnect at sign-in. This ensures that the drive stays mapped every time you log in to the computer.
- Tap on Finish.
When you’re done, reopen QuickBooks Desktop and check if you can see the mapped drives in QuickBooks.
Wrapping It Up
The above blog will provide you with the troubleshooting methods to carry out if you encounter QuickBooks not seeing mapped drives issue. However, QB issues often can be tricky and may persist even after trying multiple solutions. Only a QB ProAdvisor knows their way around difficult QuickBooks issues.
Dial 1(800) 580-5375 and speak to our ProAdvisor, who will take care of the matter for you.
Frequently Asked Question
Why can’t I see my mapped network drives?
Is your QuickBooks not seeing mapped drives? This can be because of insufficient windows or folder permissions, network errors, etc. Read more to explore why you can’t see the mapped drive in QuickBooks.
How do I open a mapped drive in QuickBooks?
To open the mapped drive in QuickBooks and access the company file stored there, open your QuickBooks in no company window. When you see the option to choose an existing company file, browse and select the folder in the mapped drive.
How do I map a network drive in QuickBooks?
In this guide, we have discussed how to map a network drive in QuickBooks. Scroll up to explore the detailed steps for mapping your host computer as a network drive.